Setting Up a Local Grav Environment with Docker: A Step-by-Step Guide

In this guide, you'll learn how to set up Grav CMS using Docker and Apache. We'll walk you through creating a project directory, installing Grav CMS, configuring Docker, and accessing your Grav CMS instance. By the end, you'll have a Dockerized Grav CMS ready to go.
Table of Contents
Docker
Docker is a platform that allows developers to build, ship, and run applications in containers. A container is a standalone package that includes everything required to run the application: code, runtime, libraries, and system tools. This ensures that the application runs consistently across various environments. Some of Docker's advantages include:
- Consistency: Docker ensures that the development environment is consistent with the production environment, reducing the "it works on my machine" issues.
- Isolation: Containers encapsulate the application and its environment, ensuring that it doesn't interfere with other applications.
- Portability: Docker containers can run on any machine that supports Docker, whether it's a developer's local machine, a test environment, or a cloud provider.
- Efficiency: Docker containers are lightweight compared to traditional virtual machines, as they share the host OS and use less resources.
Grav CMS
Grav CMS is a modern, file-based content management system. Unlike traditional CMSs, Grav doesn't rely on a database to store content; instead, it uses files for data storage. Some reasons developers and content creators might choose Grav include:
- Speed: Being file-based means there's no database to query, resulting in faster performance.
- Flexibility: Grav is highly customizable, allowing developers to build unique and tailored sites.
- Simplicity: Grav provides an intuitive and straightforward user interface, making it friendly for both developers and non-developers.
- Extensibility: The CMS has a rich set of plugins, themes, and APIs to extend its capabilities.
Prerequisites
Before proceeding, we are assuming that you already have Docker and docker-compose installed on your system. These tools are important as Docker will allow us to create and manage containers, while docker-compose will let us define and run multi-container Docker applications.
If you haven't installed these yet:
- Official Docker installation guide (Ubuntu): Docker Installation Guide
- Install Docker Compose: Docker Compose Installation Guide
This guide was created specifically for Debian-based servers. If you're using a different operating system, some commands or file paths might differ. Let's be honest, if you are using another flavor of Linux, I don't need to tell you what to change.
Setting Up the Project Directory
To kick off our Dockerized Grav CMS project, we'll start by creating a dedicated directory. This will be the root directory of our Grav CMS project where all related files, including the Docker setup, will reside. Navigate to where you want it to live, then type:
mkdir grav-cms-dockerAfter creating the directory, go into it:
cd grav-cms-dockerGrav Installation
To get the latest version of Grav CMS, we'll use the wget command. This command fetches the package directly from the Grav CMS website. -O grav-admin.zip tells it to save the file right here, and name it grav-admin.zip.
wget https://getgrav.org/download/core/grav-admin/latest -O grav-admin.zipUnzip & Rename
Once the zip file is downloaded, we need to extract its contents. We'll then rename the unzipped folder from grav-admin to grav. Finally, we will delete the original zip file. Use these three commands:
unzip grav-admin.zip
mv grav-admin grav
rm grav-admin.zip
Creating the Dockerfile
A Dockerfile is essentially a script containing a set of instructions to build a Docker image. This image can then be instantiated (launched) into a container. By using a Dockerfile, we can automate the process of setting up our environment, ensuring that it is reproducible and consistent.
For this guide we will keep the Dockerfile in the root of the project directory. cd into your projects root, and type the following to create the file:
touch DockerfileHere are the various commands we are going to put into our Dockerfile. There is a complete version at the bottom of this section.
Official Apache Image
To host our Grav website, we'll be using the official Apache base image. This image is equipped with Apache Web Server which is capable of serving PHP applications like Grav CMS.
FROM php:8.0-apacheInstall Dependencies & PHP Extensions Grav Needs
Grav CMS needs some PHP extensions to function correctly. Depending on the complexity of your site, there may be others you need to add down the line. These will get the site functioning on a fresh install.
# Update system
RUN apt-get update

# Install dependencies
RUN apt-get install -y libzip-dev libpng-dev libjpeg-dev

# Configure and install PHP extensions
RUN docker-php-ext-configure gd --with-jpeg
RUN docker-php-ext-install zip gd
Finishing Touches
Now we want to make sure that apache has mod_rewrite is enabled.
# Enable mod_rewrite for Apache
RUN a2enmod rewrite
Complete Dockerfile
With these instructions, your Dockerfile should look like this:
FROM php:8.0-apache

# Update system
RUN apt-get update

# Install dependencies
RUN apt-get install -y libzip-dev libpng-dev libjpeg-dev

# Configure and install PHP extensions
RUN docker-php-ext-configure gd --with-jpeg
RUN docker-php-ext-install zip gd

# Enable mod_rewrite for Apache
RUN a2enmod rewrite
Creating the compose.yaml File
Docker Compose is a tool for defining and running multi-container Docker applications. With Compose, you use a compose.yaml file to configure your application’s services, networks, and volumes. This makes it significantly easier to manage and orchestrate containers, especially in scenarios where multiple interdependent containers are used.
As with the Dockerfile, we will keep this one in the root:
touch compose.yamlDefine Services (e.g. webserver)
We'll start by defining the service for our webserver, which will use the Docker image we've set up through our Dockerfile.
version: '3'
services:
  webserver:
Now we add the build: . command, which tells Docker Compose to build the image using the Dockerfile in the current directory.
Then we add the ports directive which maps port 8080 on the host to port 80 in the container, making Grav accessible at http://localhost:8080 on your machine.
version: '3'
services:
  webserver:
    build: .
    ports:
      - "8080:80"
Now we are going to tell Docker to map the grav directory to /var/www/html within the image. The environment config is optional, but useful if you expand your site with a lot of functionality down the road. The command setting keeps apache running in the foreground, so the docker doesn't automatically turn off when idle.
The final compose.yaml should look like this:
version: '3'
services:
  webserver:
    build: .
    ports:
      - "8080:80"
    volumes:
      - ./grav:/var/www/html
    environment:
      - PHP_MAX_EXECUTION_TIME=300
    command: >
      bash -c "apache2-foreground"
Building & Running the Docker Container
Now that we have our Dockerfile and compose.yaml set up, it's time to build the Docker image. This will compile all the layers as defined in our Dockerfile to create a single image.
The following commands should be executed in your project's root directory (or wherever you have your compose.yaml file).
sudo docker-compose buildThis command will use the compose.yaml configuration to build the necessary Docker image for our Grav CMS setup.
Initiate Container
Once the image is built, we can initiate a container from it. This container will run our Grav CMS instance.
sudo docker-compose up -dHere, the up command starts the services defined in the compose.yaml file. The -d flag ensures that the container runs in detached mode, meaning it runs in the background and doesn't hog your terminal. If you would prefer to see what is going on (especially the first time you run it), remove -d from the command above.
Did it Work?
Now test your new site by visiting http://localhost:8080. Don't forget to swap out localhost for the IP address of the actual device if you didn't do this on your local machine. E.g. http://192.168.1.110:8080.
If everything went according to plan, you should be looking at this:
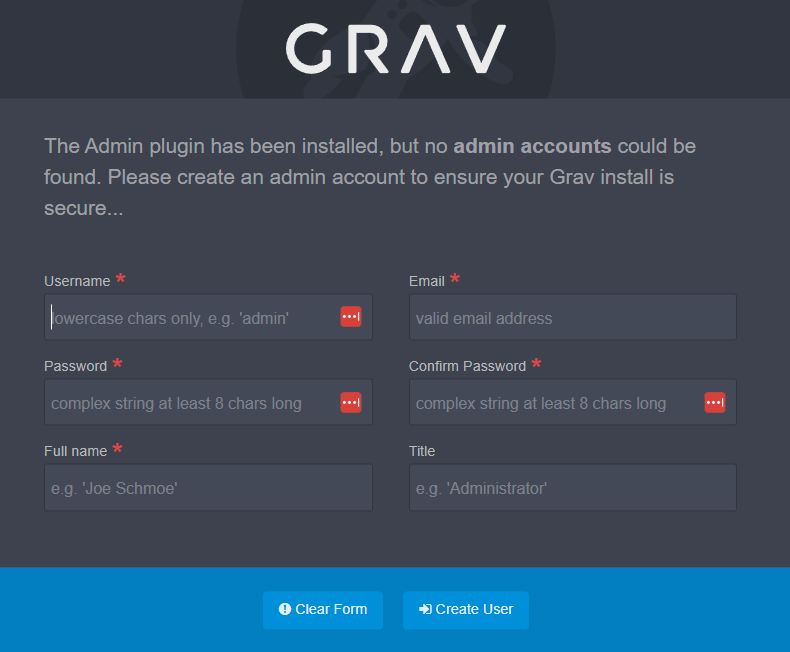
If this isn't what you are seeing, jump down to the troubleshooting section.
Docker Commands
Now is probably a good time to list some basic Docker commands. If you run into permission issues when running one of the commands below, try it again with sudo.
View all Containers:
docker ps -aView Running Containers:
docker psStart a Container:
docker start [CONTAINER_ID or CONTAINER_NAME]Shut Down a Container:
docker stop [CONTAINER_ID or CONTAINER_NAME]Restart a Container:
docker restart [CONTAINER_ID or CONTAINER_NAME]Delete a Container:
docker rm [CONTAINER_ID or CONTAINER_NAME]Final Thoughts
While this guide provides a foundational setup for Grav CMS in a Dockerized environment, there's so much more you can explore and add:
- Consider incorporating database containers if your Grav CMS setup or plugins require it.
- Add more Docker volumes to ensure persistent storage for your instance.
- Optimize for production by incorporating best security practices, HTTPS, etc.
When you feel like you have a good grasp on Docker, you can take your projects to the next level with this guide on integrating Continuous Deployment with Grav.
As you continue to advance in your Docker and Grav journey, try these resources for additional information:
Troubleshooting Tips
When working with Docker and Grav, issues might arise. Below are some common challenges and ways to address them:
-
Container fails to start. Check the logs using:
docker-compose logs webserverThe logs often provide insights into any configuration or dependency errors.
-
Grav CMS displays PHP errors. This might be due to missing PHP extensions or configurations. Review the Grav CMS documentation and ensure all required PHP extensions are included in your Dockerfile.
-
Can't access Grav CMS on
http://localhost:8080. There could be another service running on port 8080 or Docker might not have mapped the ports correctly. Try stopping other services or changing the port incompose.yaml.
Forums
If you face issues not covered in this guide, these forums are incredibly helpful:

