Add Z-WaveJS to Home Assistant on Unraid (Docker Install)

I just finished adding the ZWavejs2mqtt Docker container to my Home Assistant setup on my Unraid server, so I'm documenting the process here while its fresh. As with many things I write about on this site, there wasn't a lot of clear cut directions for my specific use case, so I pieced it together from various sources. I linked them at the bottom.
NOTE: If you already know what you're doing, but keep getting a failed to open the serial port error in the top-right corner of the Z-WaveJS UI, its the Serial Device mapping. I explain how to find your correct mapping below under the Serial Device sub-heading.
Table of Contents
The Objective
The end result will be a working Z-Wave hub integrated with Home Assistant. Here is how we will get there:
- Install a new Z-Wave USB stick
- Install and configure the Zwavejs2mqtt Docker container
- Update the settings in the container so it talks to Home Assistant
- Connect a Z-Wave device to Home Assistant
My Equipment
Here's a breakdown of what I'm doing this with, along with links when applicable. I can verify they work for me using the process outlined below.
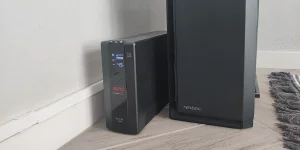
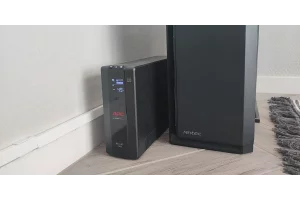
- Zooz 800 Z-Wave USB Stick - ZST39LR
- Unraid OS - v6.12.10
- Home Assistant Core - v2024.6.4
- ZWavejs2mqtt
Install ZWavejs2mqtt
Head over to the Unraid App Store and search for zwavejs. There are a few options, but the one we are going to work with is zwavejsmqtt by Selfhosters:

Docker Container Settings
If you've been using Unraid for a while, you're probably used to many containers from the app store coming with most of the settings already configured. This wasn't the case for me. Every entry was blank except the Serial device, and it turned out to be invalid. This is how mine looked originally:

NOTE: If you don't see as many configuration options, make sure to hit Show more settings... near the bottom. We will need these additional ones.
My Settings
For those of you that blindly copy configs and scripts off the internet, here you go. I describe each in a little more detail below if you want to know why (you should). The Serial device configuration is going to be unique to your system, and I'll walk you through how to find that at the bottom of this section.
WebUI: 8091
Serial device: SEE BELOW
Websocket Server: 3000
Appdata: /mnt/user/appdata/zwavejs2mqtt
Zwavejs Log: /mnt/user/appdata/zwavejs2mqtt/logs
WebUI
If you're an Unraid pro, this should be pretty easy. This is the port number to access the container's UI. I matched it to the internal container port 8091 for simplicity. Just make sure you don't have anything else running on that port (You can check by clicking on Show docker allocations... near the bottom.)
Websocket Server
Similar to the WebUI port, matching the internal container port 3000 works just fine. Make sure you don't have anything else using that port already.
Appdata
The default location for appdata data is /mnt/user/appdata/{container-name}. If you changed the location of where you store this data, you likely already know what to do here. For everyone else, put /mnt/user/appdata/zwavejs2mqtt.
Zwavejs Log
I usually keep logs in the container's appdata folder unless I have a specific reason to keep it somewhere else (like it generates GB's of logs). I don't yet know what kind of log output volume this container is going to do, but I'm putting them my usual location until I have a reason to move them. Go ahead and put /mnt/user/appdata/zwavejs2mqtt/logs in this spot.
Serial device
Now we need to tell the container the location of the Z-Wave USB stick. We need to ssh into Unraid directly, so pick your favorite tool and log in. If command lines are scary, I'll walk you through it using the built-in terminal through the Unraid web UI.
1. Open Terminal
In the top-right of your Unraid Dashboard, open Terminal:

2. Find USB ID
Type the following:
ls -l /dev/serial/by-id/You should see something that looks like this:
root@ServerName:~# ls -l /dev/serial/by-id/
total 0
lrwxrwxrwx 1 root root 13 Sep 12 09:46 usb-Zooz_800_Z-Wave_Stick_533D004242-if00 -> ../../ttyACM0
What we want is this part (yours will likely be different), so copy it:
usb-Zooz_800_Z-Wave_Stick_533D004242-if00NOTE: You may have something like -port0 or -port1 at the end of yours. If so, make sure to include that. Additionally, if you have more than one device show up, double check to ensure you're copying the correct one.
Don't paste this into the settings yet. We need to add a few things.
3. Add the Entire Path
We need to tell the container the entire path of the USB device by adding /dev/serial/by-id/ to the beginning:
/dev/serial/by-id/usb-Zooz_800_Z-Wave_Stick_533D004242-if00Don't paste this one either. We're still not done.
4. Set Internal Mapping
This was a new one for me, and it took a minute to realize what was going on. If we look at the default configuration when we first began installing this Docker container, we can see there is no internal mapping already set for the serial device. This isn't something I come across often when using the Unraid app store, so it took a moment to figure it out.

We need to manually define the device inside the Docker container. Luckily, we can do this all in the same line. The container is expecting the device location to be dev/zwave, so we can define that using a colon:
/dev/serial/by-id/usb-Zooz_800_Z-Wave_Stick_533D004242-if00:/dev/zwaveThere, that's the line you can paste into Serial device, but USE YOUR OWN USB ID!
When all was said and done, this is how my settings looked:

That should be it for the Docker configuration. Go ahead and click Apply to install it.
Configure Z-WaveJS Settings
(Please excuse the name format change. This is how its defined in the UI after the Docker container is installed, so I'll use this going forward to avoid confusion with the Unraid installation.)
Once the Docker container is installed, open up the UI:
http://{server-ip}:8091Take care of the basic housekeeping pop-ups, like sharing anonymous usage data.
Security & Region Settings
Now go into Settings > Z-Wave. You should see six spots for security keys, and a place to input your region:

- Generate security keys by clicking on the arrows to the right of each key location. You may get a red warning sign about keys matching (or not matching) but that's fine.
- Select the region you're operating the system in using the drop-down menu under RF Region.
- Hit Save.
Enable Home Assistant
Now go to Settings > Home Assistant:

- Enable
WS Server. - Make sure your Server Port matches the port number from the container setup. If you followed mine, it should be
3000. - I've seen DNS Discovery disabled on some people's install, but mine was already enabled. I've left it for now.
- Hit Save.
Add Z-Wave Integration in Home Assistant
Now open up your Home Assistant interface and go to Settings > Devices & services. Search for zwave and select the integration:

Now it will ask you where the location is. If you have a standard Unraid container setup, localhost should work. The port number is the Websocket Server we configured when we installed the new container. If you followed mine, it should be 3000. The ws at the beginning is for Websocket. Adjust yours accordingly if you customized your install:

After hitting submit, you should see a success message with your USB controller listed:

Connect Z-Wave Devices to HA
Finally the setup is done, and its time to connect devices. Go to Settings > Devices & services > Integrations and click on the Z-Wave integration, then select configure:

On the next screen you should see a green check mark at the top next to Z-Wave Network Connected. This is where you add your Z-Wave devices from. Hit the Add Device button at the bottom of the page and you're off to the races.

Resources
As I mentioned at the top, I didn't find a complete walk through during my searching. I ended up piecing this together from various docs, videos, and forums. I've linked some of them here:
- Z-Wave JS and Home Assistant - YouTube
- Z-wave js network key - HA Forum
- Z-Wave JS Docs - Official Documentation